Set up your agent wallet
Before interacting with decentralized inference markets, you need a dedicated digital identity. This wallet serves as your entry point to the network, allowing you to sign requests, receive payments for compute, and verify your reputation on-chain. Unlike a standard personal wallet used for speculation, an agent wallet is optimized for automated, high-frequency interactions with AI nodes.
Start by creating a new wallet specifically for this purpose. Keep it separate from your main holdings to isolate risk. Most decentralized inference protocols operate on EVM-compatible chains like Ethereum L2s (Arbitrum, Base) or specialized AI chains. Check the specific documentation of your target protocol to confirm which network it supports. Using the wrong chain will result in failed transactions and lost gas fees.
Once your wallet is funded, verify its balance and ensure you have the necessary tokens for transaction costs. You are now ready to connect to the inference network's gateway or SDK. This wallet will be the persistent identity that builds your history and credit score as you participate in the market.
Connect to a GPU network
To run models on decentralized inference markets, you first need to bridge your wallet to a compute provider. Think of this as renting a graphics card from a global pool rather than buying one. The most common entry points are dashboards like PAI3 or Wavefy, which aggregate idle GPUs into usable clusters.
1. Choose a Compute Provider
Start by selecting a network that supports your target model. PAI3 offers a streamlined dashboard for deploying models like Llama 3 or Stable Diffusion, while Wavefy focuses on high-throughput inference for generative AI. Both require a Web3 wallet to authenticate and pay for compute time.
2. Fund Your Wallet
Decentralized inference markets operate on crypto. You will need to hold the native token of the chosen network (e.g., $PAI for the PAI3 network) or ETH for gas fees on Ethereum-based aggregators. Transfer the required amount to your wallet address before attempting to connect. Insufficient funds are the most common reason for failed deployments.
3. Connect Wallet to Dashboard
Navigate to the provider’s official dashboard. Click the "Connect Wallet" button in the top-right corner and approve the signature request. This step does not transfer funds; it simply grants the dashboard permission to view your balance and initiate transactions. Always verify the URL to avoid phishing sites.
4. Select a GPU Instance
Once connected, browse the available compute instances. Look for specifications that match your model’s requirements, such as VRAM size and GPU type (e.g., A100, H100, or RTX 4090). The dashboard will display real-time pricing per hour. Select an instance and confirm the transaction to reserve the compute slot.
Open the official website for your chosen network, such as PAI3 or Wavefy. Ensure you are on the correct domain to avoid phishing scams. Look for the "Launch App" or "Dashboard" button in the navigation bar.
Click the "Connect Wallet" button, typically located in the top-right corner. Select your preferred wallet provider (e.g., MetaMask, Phantom, or Rabby). Approve the connection request in your wallet popup. This step authenticates your identity on the network without moving funds.
Transfer the native token (e.g., $PAI) or ETH to your wallet address. You need enough balance to cover both the compute costs and network gas fees. Check the current price of the token to estimate how much to deposit based on your expected usage time.
Navigate to the "Deploy" or "Inference" section. Select your model from the catalog (e.g., Llama 3 8B). Choose a GPU instance with sufficient VRAM. Review the hourly rate and confirm the transaction. The network will assign a node to run your model, and you will receive an API endpoint to start sending requests.
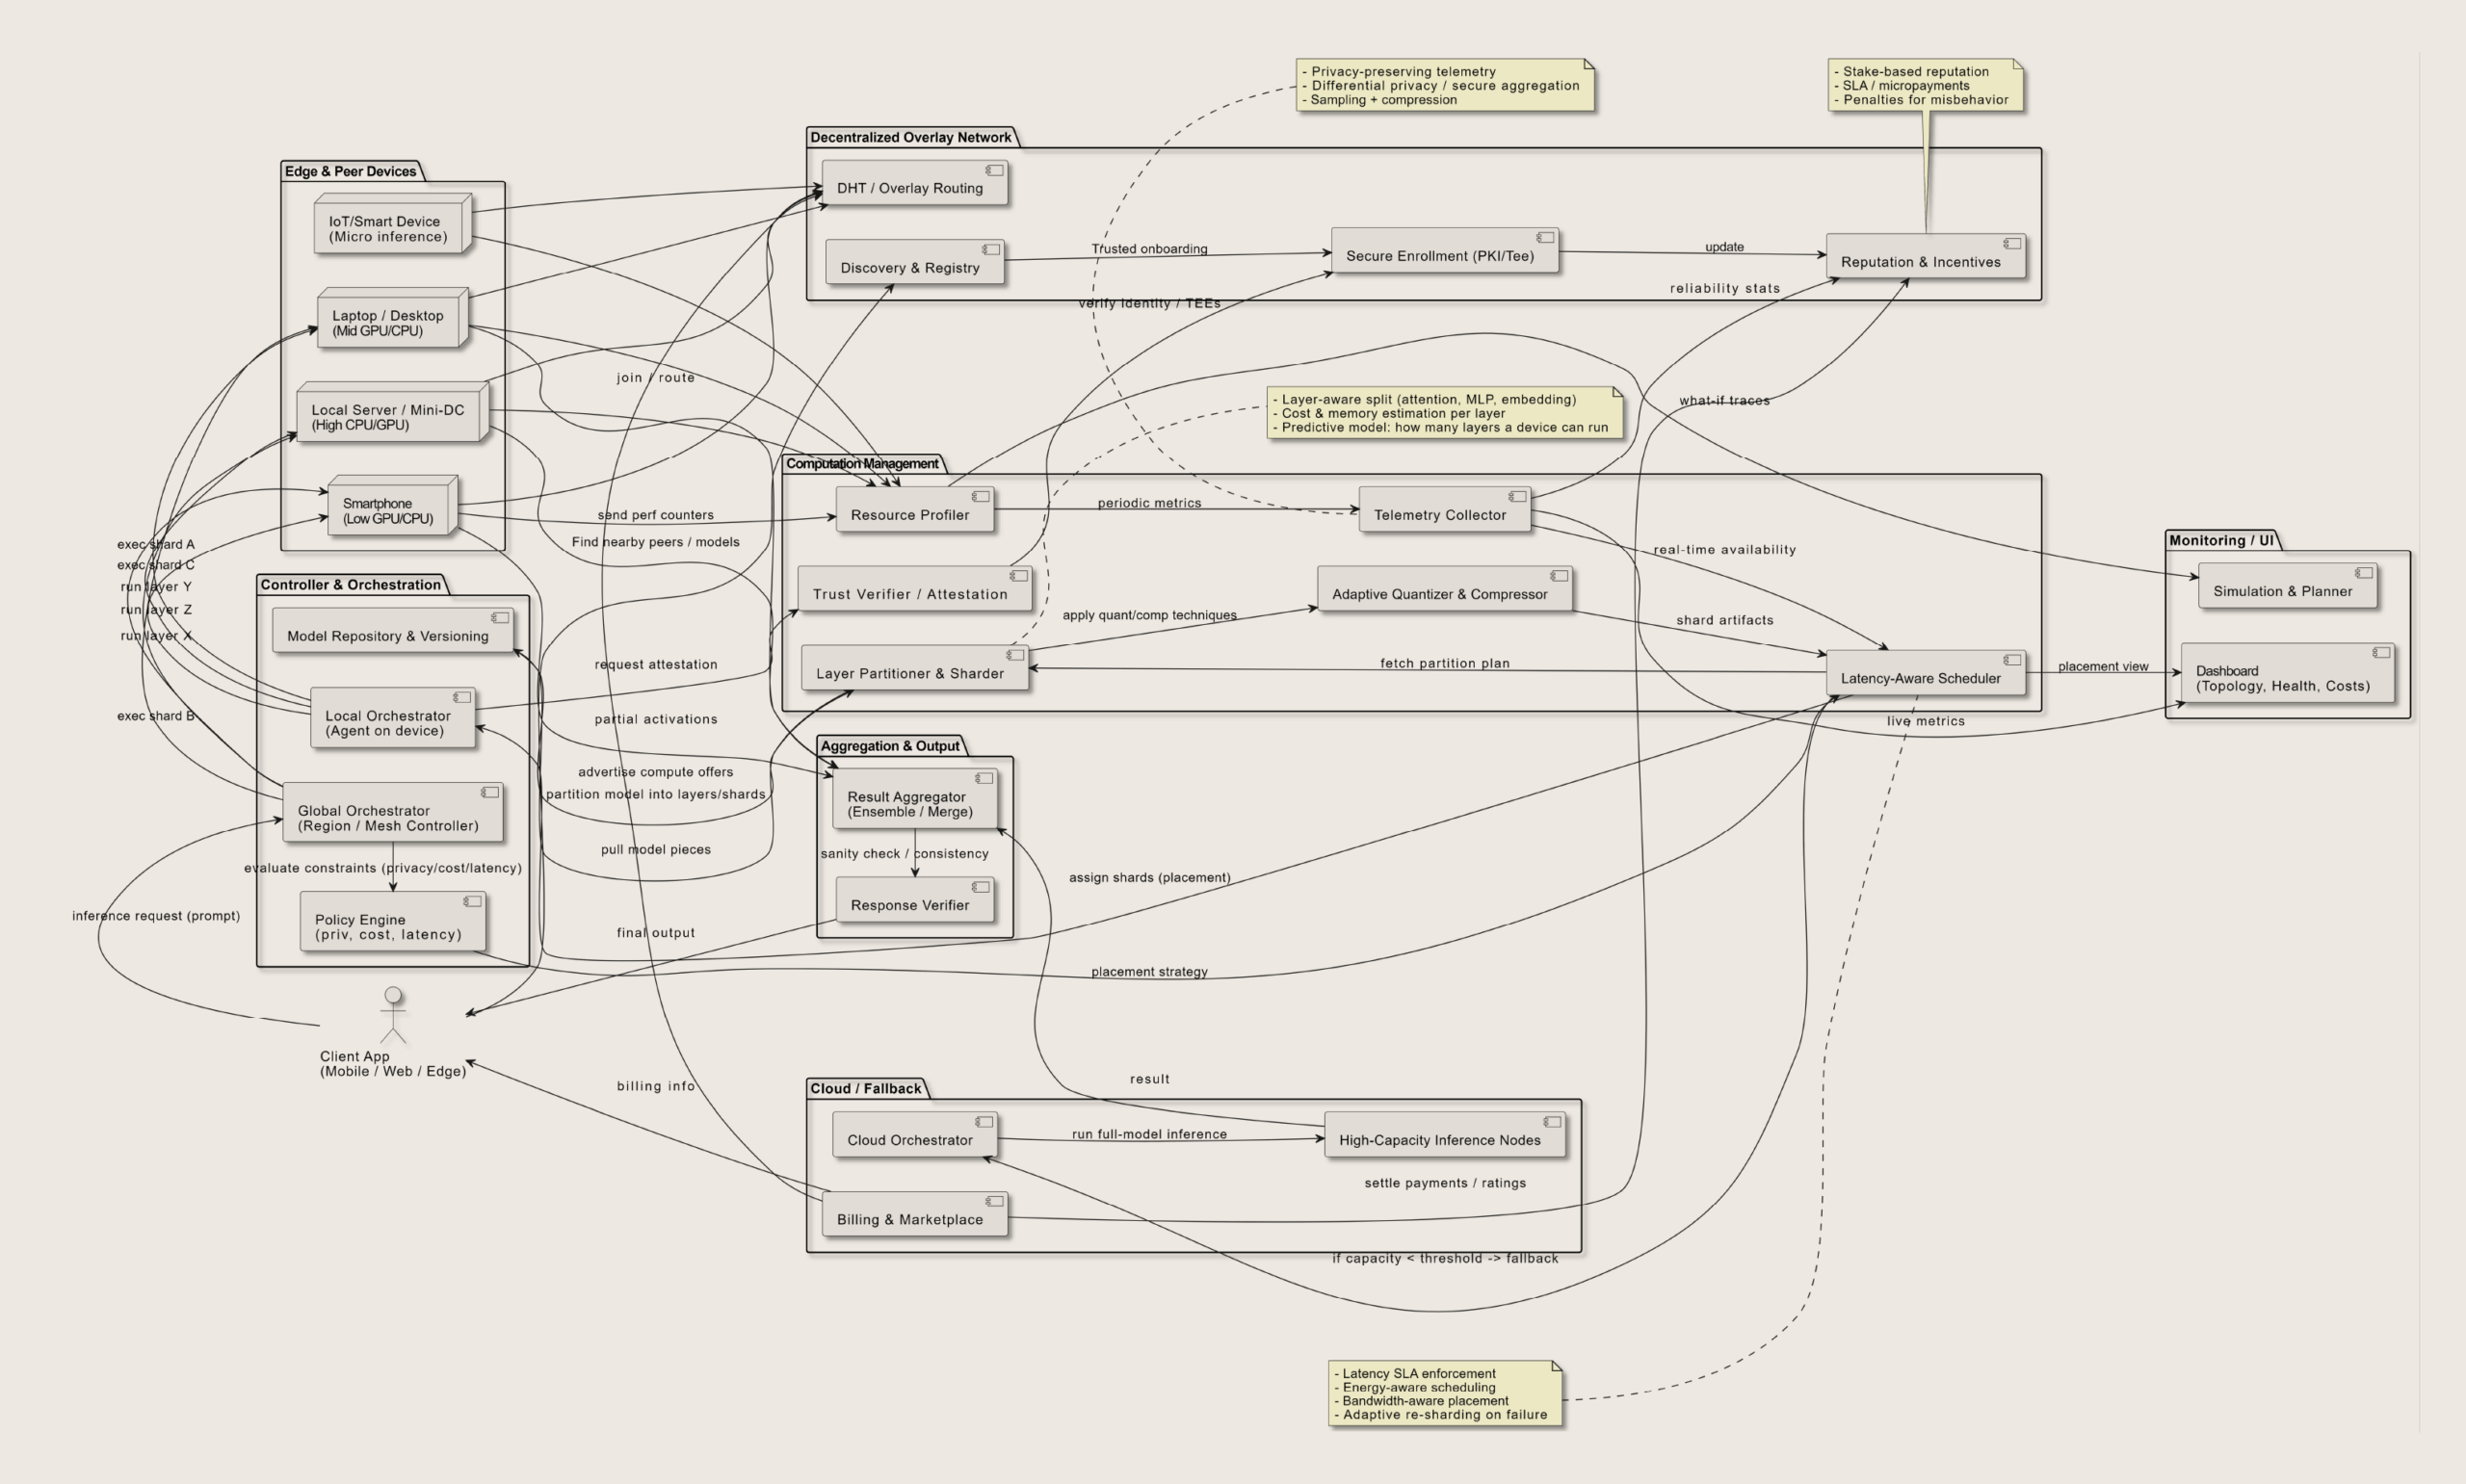
Submit inference requests
Sending a task to a decentralized inference network involves packaging your data, selecting a compute provider, and handling the token payment. Unlike centralized APIs where you send a simple HTTP request to a single server, decentralized inference requires you to interact with a network of nodes that agree to process your workload.
This process shifts the burden of infrastructure management from a single vendor to a distributed network, offering greater transparency and often lower costs for high-volume inference tasks.
Verify compute results
To ensure a decentralized node performed inference correctly without exposing the underlying data, you must rely on cryptographic verification rather than trusting the hardware. This process, often called zero-knowledge proof (ZKP) inference, allows a requester to confirm the output is valid without seeing the input data or the model weights.
Step 1: Generate a Zero-Knowledge Proof
When a node completes an inference task, it generates a cryptographic proof attesting that the computation was executed correctly against the specified model. This proof is typically a succinct argument, such as a zk-SNARK or zk-STARK, which verifies that the output matches the deterministic result of the model on the encrypted input. The node submits this proof along with the final prediction to the network. Because the proof is succinct, verifying it is computationally cheap for the requester, even if generating it is expensive for the node.
Step 2: Validate via Consensus or On-Chain Verification
Once the proof is submitted, the network validates it. In some architectures, a small committee of verifiers checks the proof off-chain before it is anchored to a blockchain. In others, the smart contract itself verifies the proof on-chain. This consensus mechanism ensures that no single node can submit a fraudulent result. If the proof fails verification, the node is slashed (penalized), and a new node is selected to retry the task. This creates a trustless environment where correctness is mathematically guaranteed.
Comparison: Centralized vs. Decentralized Verification
The table below compares the latency and cost implications of traditional centralized verification against decentralized zero-knowledge verification.
| Metric | Centralized | Decentralized ZKP |
|---|---|---|
| Verification Latency | Low (ms) | Medium (seconds to minutes) |
| Proof Generation Cost | None | High (GPU compute) |
| Trust Assumption | High (trust provider) | Low (trust math) |
| Data Privacy | Low (data exposed) | High (encrypted) |
| Scalability | High | Medium (proof bottlenecks) |
Step 3: Handle Proof Failures
If verification fails, the system automatically triggers a re-computation. This is a critical safety feature of decentralized inference markets. The protocol identifies the faulty node, records the failure on-chain for transparency, and redistributes the task to other available nodes. This redundancy ensures that the final result is always accurate, even if individual nodes fail or act maliciously.
Check your common: what to check next
Before you start building, here are the answers to the most frequent technical questions about decentralized inference markets.
Review your setup checklist
Before launching your first inference job, verify these three critical points to avoid common integration failures.
- Wallet and Network: Ensure your wallet is connected to the correct testnet or mainnet. Mismatched networks are the most frequent cause of silent transaction failures.
- Compute Access: Confirm your GPU or CPU resources are accessible to the node software. Check for driver compatibility and sufficient memory allocation.
- Test Run: Execute a small, local inference task to validate latency and output quality before committing to the network.
A successful start depends on precision. Treat this checklist as your final quality gate.
-
Verify wallet network matches the marketplace
-
Confirm hardware access and driver compatibility
-
Run a local test inference to check latency
No comments yet. Be the first to share your thoughts!